
In 2020, I wrote a post on updating firmware on old Cisco® IP phones, and I got carried away by other projects and this project went on the backburner. This year I decided to complete this project, so that I could use these wired VOIP phones as an internal phone system across multiple rooms, where I could dial a number and speak to a person in a different room. I use this to interact with my family members when I want to ask them something and do not want to walk over for whatever reason.
Asterisk is an open source PBX - Private Branch Exchange software that I used to set this up. The process is a bit involved and is tricky to get right if you miss something in the configuration.
I will describe the process in detail in this post. Note that this post does not describe a setup for making outbound calls or receiving inbound calls on actual landline phone numbers. This is for creating a custom extension per phone, and calling those extensions, similar to what you find in hotels, where you can call one room to another by dialing that room’s number.
TABLE OF CONTENTS
- 1. Setup Linux Server
- 2. Compiling Asterisk And Patching
- 3. Setting Up Asterisk Configuration
- 4. Starting Asterisk
- 5. Factory Reset With Old Firmware
- 6. Setting Up Each Phone
- 7. References
SETUP LINUX SERVER
The best way to build a private setup is to use an old laptop or desktop that can run Linux to do this. You could always do it with a VM on the cloud, but I would not recommend that at this time.
I used an Acer Aspire 250 from 2010 with a 64-bit Intel® Celeron processor, 1GB RAM and a cheap 180GB SSD. This laptop is actually sufficient for this project.
I installed Debian 12 (Bookworm) on this laptop but you can also try it with Debian 13 or Debian Testing or Ubuntu. I needed this system to be lightweight and without a GUI, so I used Debian.
The following packages were needed to be installed as dependencies:
$ su -
root$ apt -y install build-essential make git sox ffmpeg libxml2-utils tftpd-hpa \
    net-tools iptables-persistent rsyslog ghostscript apache2 nmap zip wget vim \
    openssh-server rsync mariadb-server mariadb-client bison flex flite curl mpg123 \
    sqlite3 uuid odbc-mariadb sudo subversion unixodbc ipset iptables fail2ban htop \
    tcpdump lame screen easy-rsa sysstat apt-transport-https pkgconf autotools-dev autoconf \
    dpkg-dev libsnmp-dev liblua5.2-dev libspeexdsp-dev libxml2-dev libssl-dev libsqlite3-dev \
    unixodbc-dev uuid-dev libasound2-dev libogg-dev libvorbis-dev libcurl4-openssl-dev \
    libical-dev libspandsp-dev libjansson-dev libsrtp2-dev libneon27-dev liburiparser-dev \
    libavdevice-dev automake libtool-bin portaudio19-dev libpq-dev libresample1-dev \
    libgmime-3.0-dev libiksemel-dev libncurses-dev libnewt-dev default-libmysqlclient-dev \
    libicu-dev libtiff-tools libtiff-dev screen
There maybe other libraries you may need to install while compiling Asterisk.
COMPILING ASTERISK AND PATCHING
If you followed the previous post, your Cisco® IP phones have now been set to SIP mode. To get Asterisk to work with these nearly 15-20 year old phones in SIP mode, we have to patch Asterisk with the patch that makes the phone use call manager. This patch is available from https://usecallmanager.nz/patching-asterisk.html or from the Git repo at https://github.com/usecallmanagernz/patches/.
I chose to use the Asterisk version 20.18.0 since it was marked as stable, and it is what worked for me.
Download Asterisk source v20.18.0 from their download server. It will be under the old-releases folder.
Untar the package and patch the source code.
root$ tar -zxvf asterisk-20.18.0.tar.gz
root$ cd asterisk-20.18.0/
root$ wget https://raw.githubusercontent.com/usecallmanagernz/patches/master/asterisk/cisco-usecallmanager-20.18.0.patch
root$ patch --strip=1 < ./cisco-usecallmanager-20.18.0.patch
Now compile the source code. You can choose to run make menuselect to select options, but I chose the default options as that was sufficient for this setup.
You will then compile and install the compiled binaries, and the samples which installs the configuration files in /etc/asterisk
root$ CFLAGS="-DENABLE_SRTP_AES_GCM -DENABLE_SRTP_AES_256" ./configure
root$ make
root$ make install
root$ make samples
SETTING UP ASTERISK CONFIGURATION
Now that Asterisk has been installed, we have to setup the SIP configuration files.
Asterisk has deprecated their old chan_sip module in favor of chan_pjsip module. HOWEVER, we are going to setup chan_sip for this task and disable chan_pjsip.
This is only due to the fact that these phones are quite old, the chan_sip module works well, the patch applied for the Cisco call manager is for chan_sip and it is much easier to setup.
No changes need to be made in /etc/asterisk/asterisk.conf.
In /etc/asterisk/modules.conf add or edit the following lines, so that you enable chan_sip and disable chan_pjsip.
;noload=chan_sip.so
noload=chan_pjsip.so
In /etc/asterisk/logger.conf add or edit the following lines, so that you enable some logging.
debug.log => error,warning,notice,verbose,debug
trace.log => trace
security.log => security
console => notice,warning,error
messages.log => notice,warning,error
full.log => notice,warning,error,debug,verbose,dtmf,fax
In /etc/asterisk/extensions.conf add the following lines. I have 3 phones, so 3 extensions were added: 100, 101, 102. You may choose different extension numbers or add more or as many as you need.
Remember we are setting up an internal phone system that cannot do outbound calls or receive inbound calls from external phone numbers for this post. The goal is to just call from one phone to another by dialing the extension code.
The call-extension section below is the context defined for the phones and the extensions section below is individual extensions defined with that context. This was copied verbatim from https://usecallmanager.nz/dialplan-extensions.html and modified as per my needs.
[call-extension]
exten => _X.,1,Set(PEERNAME=${EXTEN})
; By manually checking for call-forwarding, the call can be forwarded even if the phone is unregistered
same => next,Set(CALLFORWARD=${SIPPEER(${PEERNAME},callforward)})
same => next,GotoIf($[${LEN(${CALLFORWARD})} != 0]?callforward,1)
same => next,Set(MAILBOX=${SIPPEER(${PEERNAME},mailbox)})
; Phones can be made to play a different ring using the Alert-Info header, see Ring Tones for examples
same => next,ExecIf($[${LEN(${ALERT_INFO})} != 0]?SIPAddHeader(Alert-Info: <${ALERT_INFO}>))
same => next,Dial(SIP/${PEERNAME},30)
same => next,Goto(${TOLOWER(${DIALSTATUS})},1)

; Check if forwarded to the phone's voicemail extension
exten => callforward,1,GotoIf($[${CALLFORWARD} = ${SIPPEER(${PEERNAME},vmexten)}]?busy,1)
; Cisco SIP phones support displaying diversion information
same => next,Set(REDIRECTING(from-all,i)="${SIPPEER(${PEERNAME},callerid_name)}" <${SIPPEER(${PEERNAME},callerid_num)}>)
same => next,Set(REDIRECTING(reason,i)=cfu)
same => next,Goto(extensions,${CALLFORWARD},1)

; If ${MAILBOX} is empty send congestion, otherwise go to voicemail extension below
exten => congestion,1,ExecIf($[${LEN(${MAILBOX})} = 0]?Congestion(10))
same => next,Set(GREETING=u)
same => next,Goto(voicemail,1)

; If ${MAILBOX} is empty send busy, otherwise go to voicemail extension below
exten => busy,1,ExecIf($[${LEN(${MAILBOX})} = 0]?Busy(10))
same => next,Set(GREETING=b)
same => next,Goto(voicemail,1)

exten => noanswer,1,Goto(congestion,1)
exten => chanunavail,1,Goto(congestion,1)

exten => voicemail,1,Answer()
same => next,Wait(0.5)
same => next,VoiceMail(${MAILBOX},${GREETING})
same => next,Hangup(normal_clearing)

[extensions]
exten => 100,1,Goto(call-extension,${EXTEN},1)
; Note the duplication of the hint peername
same => hint,SIP/100,SIP/100
exten => 101,1,Goto(call-extension,${EXTEN},1)
same => hint,SIP/101,SIP/101
exten => 102,1,Goto(call-extension,${EXTEN},1)
same => hint,SIP/102,SIP/102
Edit the /etc/asterisk/sip_notify.conf to have the following configuration for notifying the phones/extensions directly from the Asterisk command line interface (CLI). This will enable the Asterisk administrator to reboot or reload configurations for every phone peer directly from the Asterisk CLI. This content may
already be present in the sip_notify.conf file due to the patch that was compiled into Asterisk. I am writing this here in case you need to verify.
; Cisco

[cisco-check-cfg]
Event=>check-sync

[cisco-restart]
Event=>service-control
Subscription-State=>active
Content-Type=>text/plain
Content=>action=restart
Content=>RegisterCallId={${SIPPEER(${PEERNAME},regcallid)}}
Content=>ConfigVersionStamp={00000000-0000-0000-0000-000000000000}
Content=>DialplanVersionStamp={00000000-0000-0000-0000-000000000000}
Content=>SoftkeyVersionStamp={00000000-0000-0000-0000-000000000000}
Content=>FeatureControlVersionStamp={00000000-0000-0000-0000-000000000000}
Content=>HeadsetVersionStamp={0-0000000000}

[cisco-reset]
Event=>service-control
Subscription-State=>active
Content-Type=>text/plain
Content=>action=reset
Content=>RegisterCallId={${SIPPEER(${PEERNAME},regcallid)}}
Content=>ConfigVersionStamp={00000000-0000-0000-0000-000000000000}
Content=>DialplanVersionStamp={00000000-0000-0000-0000-000000000000}
Content=>SoftkeyVersionStamp={00000000-0000-0000-0000-000000000000}
Content=>FeatureControlVersionStamp={00000000-0000-0000-0000-000000000000}
Content=>HeadsetVersionStamp={0-0000000000}

[cisco-prt-report]
Event=>service-control
Subscription-State=>active
Content-Type=>text/plain
Content=>action=prt-report
Content=>RegisterCallId={${SIPPEER(${PEERNAME},regcallid)}}
Edit the /etc/asterisk/sip.conf file with the following details. NOTE: Cisco® phones will need TCP to be enabled for them to work.
Make sure that TCP is enabled in the general section of the sip.conf file.
[general]
tcp_enable=yes
tcpbindaddr=0.0.0.0
In the same file /etc/asterisk/sip.conf now define the Cisco call manager specific settings as below. The extensions have to match the extension numbers in /etc/asterisk/extensions.conf.
All names have been changed to USER_<extension> for privacy but you can setup your own names here. For simplicity the passwords are the same as the extension number. You can change that to any alphanumeric password if you like.
We are using non-secure mode here, so everything is in clear-text, there is no encryption. That is something for a different post in the future, since encryption setup is a lot more complicated and brittle. A lot of these old phones support outdated encryption methods and I did not have time to test that yet.
I have defined a custom section cisco-7941 for all my phone types. It is a very basic configuration and does not do video calls.
The secret, callerid and description can be changed per device as needed. For example, I used my first name as the callerid and description fields instead of USER 100.
[non-secure-mode](!)
transport=tcp

[extension](!)
type=friend
context=extensions
host=dynamic
trustrpid=no
parkinglot=default
allowsubscribe=yes
notifyhold=no
callcounter=yes
videosupport=no
disallow=all
allow=g722,ulaw,alaw,g729

[cisco-usecallmanager](!,extension)
transport=tcp
nat=no
directmedia=no
sendrpid=rpid
rpid_update=yes
rpid_immediate=yes
send_diversion=yes
dndbusy=yes
cisco_usecallmanager=yes
cisco_pickupnotify_alert=from,to
cisco_pickupnotify_timer=5
cisco_keep_conference=no
cisco_multiadmin_conference=yes
huntgroup_default=no

[cisco-7941](!,cisco-usecallmanager)
; These should match <busyTrigger> and <maxNumCalls> in SEPMAC.cnf.xml
busylevel=4
call-limit=5
; Force huntgroup login so that the prompt does not show the logged out message
huntgroup_default=yes
; 79x1 series only support 32-bit tags
encryption_taglen=32

[101](cisco-7941,non-secure-mode)
;; change this password
secret=101
;; change user name caller ID
callerid="USER 101" <101>
;; change description
description="USER 101"
callgroup=1
pickupgroup=1
mailbox=101@default

[100](cisco-7941,non-secure-mode)
;; change this password
secret=100
;; change user name caller ID
callerid="USER 100" <100>
;; change description
description="USER 100"
callgroup=1
pickupgroup=1
mailbox=100@default

[102](cisco-7941,non-secure-mode)
;; change this password
secret=102
;; change user name caller ID
callerid="USER 102" <102>
;; change description
description="USER 102"
callgroup=1
pickupgroup=1
mailbox=102@default
Now that Asterisk has been configured, let’s start it.
STARTING ASTERISK
You will need to create an asterisk user and group.
root$ addgroup --system asterisk
root$ adduser --system --ingroup asterisk asterisk
If your Asterisk install, installed a systemd file you can run
root$ systemctl start asterisk
In my case, I wanted to view the startup screen, so I launched it in a screen terminal.
root$ screen -
screen$ su -g asterisk -c "/usr/sbin/asterisk -mqf -C /etc/asterisk/asterisk.conf" asterisk
This will start Asterisk in the screen and you can see the process working. You can exit this screen session by pressing Ctrl A Ctrl D.
You can also check if Asterisk is listening on both TCP and UDP port 5060 by running netstat -vnatpul | grep 5060.
$ netstat -vnatpul | grep 5060
tcp        0      0 0.0.0.0:5060            0.0.0.0:*               LISTEN      -
udp        0      0 0.0.0.0:5060            0.0.0.0:*                           -
Now let’s try the Asterisk CLI tool to connect to the Asterisk service.
root$ asterisk -rvvvv
CLI> help
The help command will show you all the supported commands.
The sip show peers command will show you the connected peers (or the extensions) as configured in sip.conf above. The phones may not be connected yet, but if they are you will see all their details and their IP addresses.
The dialplan show extensions will show all the configured extensions as defined in extensions.conf.
CLI> sip show peers
Name/username             Host                                    Dyn Forcerport Comedia    ACL Port     Status      Description
100/100                   192.168.9.100                            D  No         No             25348    Unmonitored USER 100
101/101                   192.168.9.101                            D  No         No             42813    Unmonitored USER 101
102/102                   192.168.9.102                            D  No         No             39144    Unmonitored USER 102
3 sip peers [Monitored: 0 online, 0 offline Unmonitored: 3 online, 0 offline]

CLI> dialplan show extensions
[ Context 'extensions' created by 'pbx_config' ]
  '100' =>          hint: SIP/100,SIP/100                         [extensions.conf:954]
                    1. Goto(call-extension,${EXTEN},1)            [extensions.conf:952]
  '101' =>          hint: SIP/101,SIP/101                         [extensions.conf:956]
                    1. Goto(call-extension,${EXTEN},1)            [extensions.conf:955]
  '102' =>          hint: SIP/102,SIP/102                         [extensions.conf:958]
                    1. Goto(call-extension,${EXTEN},1)            [extensions.conf:957]

-= 3 extensions (6 priorities) in 1 context. =-
Let’s assume all your phones are online.
To reboot a phone with extension 100 remotely, you can run the following command:
CLI> sip notify cisco-reset 100
To reload a phone’s configuration with extension 100 remotely, you can run the following command:
CLI> sip notify cisco-restart 100
Now let us move on to setting up each phone.
FACTORY RESET WITH OLD FIRMWARE
Please read and follow the previous post to update the firmware for the phones first. I am using Cisco® 7961G and 7975G models, which I procured on eBay for $20 each.
You will need the tftpd-hpa setup as in the post. Your router can be configured to make the default TFTP server be 192.168.9.99, which is the IP address of the Asterisk server we will be using here.
Your actual IP address may be different.
You will need the firmware updated and working. The phone will end up saying Unconfigured or Registering.
Now remove the firmware from the TFTP folders and only leave the files ending in .loads in there.
SETTING UP EACH PHONE
Each phone has to be configured with a specific XML file, and some generic XML files that should all be placed in the same folder that serves the TFTP service, which in our case is /srv/tftp on the same Linux server that runs Asterisk.
XMLDefault.cnf.xml
This is a file that every phone reads for the firmware to load, and also specifies the IP address of the SIP server. You can download this file here.
Remember to edit the processNodeName to point to your IP address where you run the Asterisk and TFTP servers.
The loadInformation should hold the SIP firmware if you want to upload that each time the phone reboots. The firmware must be placed in the TFTP folder.
I am not clear on whether this firmware needs loading each time.
<Default>
  <callManagerGroup>
    <members>
      <member priority="0">
        <callManager>
          <ports>
            <ethernetPhonePort>2000</ethernetPhonePort>
            <mgcpPorts>
              <listen>2427</listen>
              <keepAlive>2428</keepAlive>
            </mgcpPorts>
          </ports>
          <processNodeName>192.168.9.99</processNodeName>
        </callManager>
      </member>
    </members>
  </callManagerGroup>
  <loadInformation434 model="Cisco 7961G-GE">SIP41.8-4-2S</loadInformation434>
  <loadInformation300 model="Cisco 7961">SIP41.8-4-2S</loadInformation300>
  <loadInformation437 model="Cisco 7975">SIP75.8-4-2S</loadInformation437>
  <loadInformation457 model="Cisco 7975G">SIP75.8-4-2S</loadInformation457>
  <authenticationURL></authenticationURL>
  <directoryURL></directoryURL>
  <idleURL></idleURL>
  <informationURL></informationURL>
  <messagesURL></messagesURL>
  <servicesURL></servicesURL>
</Default>
Other XML Files
The following XML files are downloaded from other Asterisk setups on Github, and the internet referenced later.
Most of these do not need change, and I used them as-is. The UseCallManager.nz site has details on each file if you want to modify them.
dialplan.xml: This file defines a pattern matching for extensions. I used the default patterns since my extensions are internal. You can download this file here.AppDialRules.xml: The list of transformation rules applied to numbers dialed through either the phone’s received call history or via the bluetooth address book is specified for newer model phones. I used the default patterns since my extensions are internal. You can download this file here.DialTemplate.xml: Dial templates control what number patterns are valid and how many seconds to wait for extra digits before dialing. I used the default patterns since my extensions are internal. You can download this file here.FeaturePolicy.xml: Feature policy controls what features are enabled, mostly for newer model phones. I used the default patterns since my extensions are internal. You can download this file here.SoftKeys.xml: This file defines the configurable keys and tags on the phone. I used the default patterns since my extensions are internal. You can download this file here.
SEPMAC.cnf.xml
Now we come to the main configuration file for each phone. The SEPMAC.cnf.xml file needs to be unique for each phone, where the MAC part is the MAC address of the phone. This MAC address can be found behind the phone in a sticker or by checking the Network Settings of the phone.
For instance, if your phone has a MAC address of 00:AA:BB:CC:DD:EE the file will be called SEP00AABBCCDDEE.cnf.xml. I have provided a sample here and here.
I will mention the important changes I made to this file for each phone. You must verify that these changes are per your liking.
First check the NTP server information. I use pool.ntp.org and setup my time zone to be Eastern Standard/Daylight Time since I am in that time zone. I also selected M/D/YY for the date display on the phone since I am in the USA. You may prefer D/M/YY instead.
    <dateTimeSetting>
      <dateTemplate>M/D/YY</dateTemplate>
      <timeZone>Eastern Standard/Daylight Time</timeZone>
      <ntps>
        <ntp>
          <name>pool.ntp.org</name>
          <ntpMode>unicast</ntpMode>
        </ntp>
      </ntps>
    </dateTimeSetting>
Next make sure your IP address for the Asterisk service is set correctly, in my case to 192.168.9.99.
    <callManagerGroup>
      <members>
        <member priority="0">
          <callManager>
            <ports>
              <sipPort>5060</sipPort>
              <securedSipPort>5061</securedSipPort>
            </ports>
            <processNodeName>192.168.9.99</processNodeName>
          </callManager>
        </member>
      </members>
    </callManagerGroup>
Now go to the section titled sipLines in the file. We have a single line defined, since the phone system will answer only on one line at this time. If you want to setup multiple lines you can refer to the UseCallManager.nz website for more details.
As you can see below, I have setup the 100 extension in this specific phone and used the same authName and authPassword as defined in the secret in /etc/asterisk/sip.conf file in the earlier section. The displayName is the same as callerid field in the sip.conf
file. The name and featureLabel should be the extension name which in our case is 100.
The busyTrigger and maxNumCalls in this file should match busylevel and call-limit in the sip.conf file.
    <sipLines>
      <line button="1" lineIndex="1">
        <featureID>9</featureID>
        <featureLabel>100</featureLabel>
        <proxy>USECALLMANAGER</proxy>
        <port>5060</port>
        <name>100</name>
        <displayName>USER 100</displayName>
        <autoAnswer>
          <autoAnswerEnabled>0</autoAnswerEnabled>
        </autoAnswer>
        <callWaiting>3</callWaiting>
        <authName>100</authName>
        <authPassword>100</authPassword>
        <contact>100</contact>
        <sharedLine>false</sharedLine>
        <messageWaitingLampPolicy>3</messageWaitingLampPolicy>
        <messageWaitingAMWI>0</messageWaitingAMWI>
        <messagesNumber></messagesNumber>
        <ringSettingIdle>4</ringSettingIdle>
        <ringSettingActive>5</ringSettingActive>
        <forwardCallInfoDisplay>
          <callerName>true</callerName>
          <callerNumber>true</callerNumber>
          <redirectedNumber>true</redirectedNumber>
          <dialedNumber>true</dialedNumber>
        </forwardCallInfoDisplay>
        <maxNumCalls>5</maxNumCalls>
        <busyTrigger>4</busyTrigger>
        <recordingOption>enable</recordingOption>
      </line>
    </sipLines>
Also edit the phoneLabel field to show the name of the phone extension.
<phoneLabel>USER 100</phoneLabel>
The featurePolicyFile, dialTemplate and softKeyFile should point to FeaturePolicy.xml, DialTemplate.xml and SoftKeys.xml which are placed in the /srv/tftp folder. You can also serve these files via HTTP if you like.
    <dialTemplate>DialTemplate.xml</dialTemplate>
    <softKeyFile>SoftKeys.xml</softKeyFile>
<featurePolicyFile>FeaturePolicy.xml</featurePolicyFile>
The loadInformation for this phone configuration must have the correct .loads filename which also should match the loadInformation fields in the XMLDefault.cnf.xml file described above. For the Cisco® 7961G, the below loadInformation line was used.
<loadInformation>SIP41.8-4-2S</loadInformation>
To get the phone directories to work, we need to add a directoryURL field pointing to the XML file with the directory contents and also update the phoneServices to add a Contacts section.
  <phoneServices useHTTPS="false">
    <provisioning>2</provisioning>
    <phoneService type="1" category="0">
      <name>Contacts</name>
      <url>http://192.168.9.99/Directory.xml</url>
      <vendor></vendor>
      <version></version>
    </phoneService>
    <phoneService type="1" category="0">
      <name>Missed Calls</name>
      <url>Application:Cisco/MissedCalls</url>
      <vendor></vendor>
      <version></version>
    </phoneService>
    <phoneService type="1" category="0">
      <name>Received Calls</name>
      <url>Application:Cisco/ReceivedCalls</url>
      <vendor></vendor>
      <version></version>
    </phoneService>
    <phoneService type="1" category="0">
      <name>Placed Calls</name>
      <url>Application:Cisco/PlacedCalls</url>
      <vendor></vendor>
      <version></version>
    </phoneService>
    <phoneService type="2" category="0">
      <name>Voicemail</name>
      <url>Application:Cisco/Voicemail</url>
      <vendor></vendor>
      <version></version>
    </phoneService>
  </phoneServices>
<directoryURL>http://192.168.9.99/Directory.xml</directoryURL>
As you can see we are serving this Directory.xml file from a HTTP port on the same Linux server running Asterisk.
We describe hosting this file in the next section.
Lastly, if you want to setup SSH into the phone, which I have not been able to test fully at the moment, you can edit the sshUserId and sshPassword tags.
  <sshUserId>phone100</sshUserId>
  <sshPassword>password100</sshPassword>
NOTE: The phones are so old that they do not support secure SSH encryption protocols. You may have to downgrade the encryption scheme to get it to work.
Directory.xml
We host the Directory.xml file on an Apache2 service on the same Linux server that runs Asterisk. We installed apache2 as a dependency initially.
For my extensions 100, 101 and 102, the Directory.xml looks like the below. You must change the Name and Telephone tags to match your extensions and caller-IDs.
You will need one DirectoryEntry per extension.
You can download this file here.
<CiscoIPPhoneDirectory>
    <Title>Internal PBX</Title>
    <Prompt>Select Contact</Prompt>
    <DirectoryEntry>
        <Name>USER 100</Name>
        <Telephone>100</Telephone>
    </DirectoryEntry>
    <DirectoryEntry>
        <Name>USER 101</Name>
        <Telephone>101</Telephone>
    </DirectoryEntry>
    <DirectoryEntry>
        <Name>USER 102</Name>
        <Telephone>102</Telephone>
    </DirectoryEntry>
</CiscoIPPhoneDirectory>
When setting up Apache2, you need to make sure it returns this file with a header of Content-Type: text/xml, otherwise the phone will not be able to parse it.
Below is a sample Apache2 configuration that will work. Many examples on the internet dynamically generate this XML file but I have a static file.
<VirtualHost *:80>
        ServerAdmin webmaster@localhost
        DocumentRoot /var/www/html
        ErrorLog ${APACHE_LOG_DIR}/error.log
        CustomLog ${APACHE_LOG_DIR}/access.log combined
        <Files "Directory.xml">
            ForceType text/xml
        </Files>
</VirtualHost>
You can also use nginx instead of Apache2 if you prefer that. The Content-Type header must be text/xml.
ringlist.xml
If you want to add multiple ringtons to the phone, you will need to setup a ringlist.xml file with the ringtone files along with it in the /srv/tftp folder.
I got a lot of my ringtones from this Github repo and I setup my ringlist.xml file which can be downloaded here.
It will have contents that look like below, where the FileName is the path relative to the TFTP server directory.
<CiscoIPPhoneRingList>
    <Ring>
        <DisplayName>Are you there Male?</DisplayName>
        <FileName>AreYouThere.raw</FileName>
    </Ring>
    <Ring>
        <DisplayName>Are you there Female?</DisplayName>
        <FileName>AreYouThereF.raw</FileName>
    </Ring>
    <Ring>
        <DisplayName>Analog 1</DisplayName>
        <FileName>Analog1.raw</FileName>
    </Ring>
    <Ring>
        <DisplayName>Analog 2</DisplayName>
        <FileName>Analog2.raw</FileName>
    </Ring>
    <Ring>
        <DisplayName>Bass</DisplayName>
        <FileName>Bass.raw</FileName>
    </Ring>
    <Ring>
        <DisplayName>CallBack</DisplayName>
        <FileName>CallBack.raw</FileName>
    </Ring>
    <Ring>
        <DisplayName>Chime</DisplayName>
        <FileName>Chime.raw</FileName>
    </Ring>
</CiscoIPPhoneRingList>
Background Images
You can change the background image by creating a Desktop folder with a structure for each phone you want to support.
Details are described in UseCallManager.nz’s description for this feature.
I have placed a sample collection for my 7961G and 7975G phones here. You can run tar -zxvf on the Desktops.tar.gz file and place it in /srv/tftp as is.
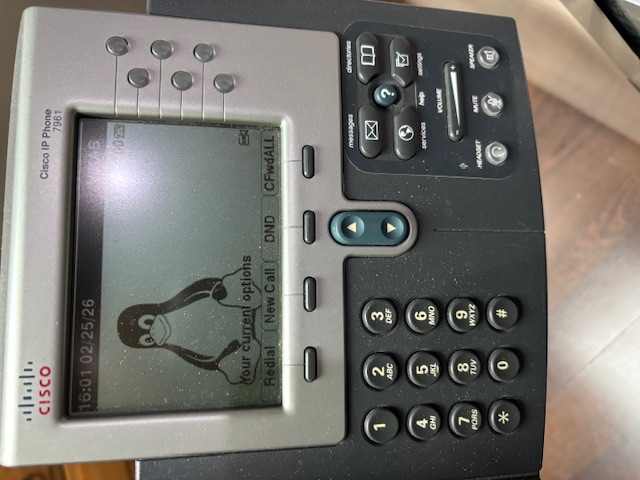
As you can see in the below image, I got a Linux penguin icon showing up as my desktop screen. You can see that instead of USER 100 I have used my first name VIKAS in the configurations everywhere, which is visible on the top right corner of the screen.
REFERENCES
I was helped by many references from the internet and I am listing all of them here, so they can be of reference to you too.
- Asterisk
- Asterisk old releases
- FreePBX - I ended up not using the FreePBX software since they wanted me to pay money to get Cisco® phones to work. The whole point of this project is for this to be free.
- UseCallManager.nz - There is a ton of information on this site and I have only scratched the surface. Without the hard work that has gone into making this site and the patch, this endeavour would be futile.
- Github - usecallmanager
- Github - cisco_prov by staskobzar
- Github - provision_sccp by dkgroot
- Github - chan_sccp by chan-sccp
- Github - Cisco7942FreePBX by waynemerricks
- Github - Cisco-IP-Phone-Provisioning-Files by NamoDev
- Github - Cisco-IP-Phones by PintoBernardo
- Github - cisco_voip_phones_xml_generator by MrCirca
- Github - old Asterisk configs by jefffall
- Cisco Application development notes
- Asterisk Pro
 Donate BITCOIN to 19hrWWw1dPvBE1wVPfCnH8LqnUwsT3NsHW.